Automator Workflow Techniques: Rename, Convert, and Caption Images
For photographers, organising and maintaining thousands of images can be quite a task. However, Automator can provide some relief. Use Automator to batch rename your digital images, convert them from one format to another, add copyright information, and more! Create a customised image workflow that’s right for you.
The following steps will walk you through the process of creating an Automator workflow that will run when image files are added into an input folder. This workflow will rename the images sequentially, along with the current date, convert them to TIFF format, and add copyright information using Photoshop.
NOTE: This example workflow makes use of a third-party Photoshop action that is available from Automated Workflows, LLC. To use this workflow, you will need to download the Add IPTC Captions to Photoshop Documents action, which is available for in demo form, along with dozens of other great actions.
Step 1: Create a new folder on your desktop, and name it Images Input.
Step 2: Launch Automator, located in the Applications folder, and create a new workflow window.
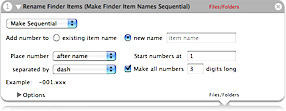
Step 3: Select the Finder category, located in the Library list in Automator. Select the Rename Finder Items action in the Action list, and drag it into the workflow area on the right side of the Automator window. Choose Make Sequential from the popup at the top of the action. Select the new name radio button, and leave the item name field blank. Select the Make all numbers checkbox, and enter a value of 3 into the digits long field.
Step 4: Locate and select the Rename Finder Items action in the Finder category again, and drag it into the workflow area a second time. Select Current from the Date/Time popup, Before name from the Where popup, Dash from the first Separator popup, and None from the second Separator popup. Select the Use Leading Zeros checkbox.

Step 5: Locate and select the Change Type of Images action in the Preview category, and drag it into the workflow area. Select TIFF from the To Type popup.

Step 6: Locate and select the Add IPTC Captions to Photoshop Documents action* in the Adobe Photoshop CS2 category, and drag it into the workflow area. Enter the desired text into the Author, Copyright Notice, Copyright URL, and any other fields you would like to populate. Select Copyrighted from the Copyright Status field. Select the Save and Close checkbox.

Step 7: Choose Save as Plug-in… from the File menu in Automator. Enter Rename, Convert, and Caption in the Save Plug-in As field, and choose Folder Actions from the Plug-in for popup. Select Other… from the Attached to Folder popup, and choose the Images Input folder on your desktop. If an Enable Folder Actions checkbox is visible, select it. Click the Save button.

*NOTE: This is a third-party action, and may be downloaded in demo form from Automated Workflows, LLC’s website.


